Thursday 11 June 2015

Cheese Making

I've decided to make my own cheese.
I'm not brave enough to dive straight into unpasteurised milk territory, so the first job is to make a starter solution with some culture purchased on Ebay.
It's a bit of a carry on. Heat the milk to 90 degrees, hold at that temperature for 10 minutes. Then cool rapidly to 20 degrees. Whisk in the culture and transfer straight into a class jar, quickly cover with clingfilm.
This can now sit for 24 hours at between 20-22 degrees. I found our bedroom to be the perfect temperature.
The solution can also be frozen to use later. Perfect.


Saturday 2 May 2015

Lamb Prosciutto - Small piece is ready!

The small piece is ready and is pretty nice. Mike and Rach have been gorging themselves silly on it! The larger piece probably needs another two weeks, so back into the loft it goes.
You can really taste the cure!


Sunday 26 April 2015

Lamb Prosciutto - About 10 days in.

I weighed both pieces on Friday to see if they were nearing their target weights. The little piece weighed only 195g, less than it's target weight of 210g. So in theory that piece is ready. It felt a little soft to me though and rather than have a repeat of the bresaola cock-up (now in the bin) I have decided it can go back in the loft for another week.
The larger piece certainly looks the part and now weighs 597g, target weight 542.5g. Let's see what it weighs next week.

Wednesday 15 April 2015

Lamb Prosciutto - Next Bit

The lamb has now had 15 days in the cure mix. I gave it a good wash in cold water then dried it thoroughly.


Next job is to roll it up nice and tight. You don't really want any air getting into the middle. If you YouTube butchers knot there are plenty of demos. It's not as easy as it looks and mine didn't work out too great, but they'll do.


Before hanging them out to dry weigh them. They are ready after they have lost 30% of their weight. 


I'll weight these once a week until they hit their target weight!


Tuesday 31 March 2015

Lamb Prosciutto

Whole legs of lamb are currently on special at Sainsbury's, only 5GBP per KG. With that in mind I'd have to be barking mad not to give this a whirl.


First job is to get the bone out and butterfly it as I need it evenly sized for curing purposes and I'll be rolling it up later. Deboning it was easy enough, although I ended up with two pieces. My little piece I suspect is the shank. That has worked out quite nicely however as the little piece won't take too long to air dry.


Next weight it as you'll work out the weight of the other ingredients from the meat's weight.


Now to calculate the weight of the cure ingredients from the 1124g starting point based on the following percentages.
1. 3.8% salt
2. 3% sugar
3. 2% minced garlic
4. 1.4% black pepper
5. 1% fresh rosemary
6. 0.4% flattened juniper berries
7. 0.25% Prague powder No.2


After weighing it all out mix it all up.


Sprinkle half on the bottom of a large zip-lock bag and plonk the lamb on top. Grab the second half and massage it onto the top of the meat. Flip over and give the underside a massage. Bung it in the fridge for 15 days, massaging both sides daily. 


Phase one has begun. Phase two in commences in 15 days.


Sunday 29 March 2015

Homemade Bresaola - Not quite right!

It's had three week and has lost about 40% of its weight. To my knowledge that surely means it is ready! It would appear not! I cut the lump in half and it is quite squishy in the middle.


@lambposts of River Cottage fame to the rescue again. He says bung it in the fridge and it should toughen up in 10 days or so. Job done!

Sunday 22 March 2015

Homemade Bresaola - MAJOR MOULD - Week2

Six days ago. Nothing. Now this.


White mould is good. Green, not so good, but not the end of the world. It's black mould that would be the death of it. Can I see black mould? Maybe.

I'll plough on with it anyway. I've washed the worst of it off with red wine vinegar and popped it back in the loft for the final week.


Thursday 19 March 2015

Homemade Salami/Chorizo - FINISHED

Job done! Not nearly as much mould as the last time I made them. Not sure why? Any mould that was on there I washed off with red wine vinegar. They're nice and firm (maybe too firm) with a peppery kick. They've lost a lot of weight, again more than last time, again I'm not sure why? Next time I'm going to make them fatter. Maybe try and get hold of an ox bung. That ought to do the job.
http://www.sausagemaking.org/acatalog/Natural_OX_bung.html


Sunday 15 March 2015

Bresaola - Air Cured Beef - Hung for 1 Week

The beef has been hanging in the loft for a week so I couldn't resist a peek. It looks great. Exactly how I'd expect it to be. Two weeks to go for this.


In other news, from 23rd March legs of lamb are 5.50GBP per KG instead of 11GBP in Sainsbury's. Next project therefore will be Lamb Prosciutto!


Friday 13 March 2015

Homemade Salami/Chorizo - Week3 (Mould Close-Ups)

Not much more mould really, which is a bit disappointing. Definately still shrinking. I'll be eating these beasts this time next week!


Into the last week we go!


Tuesday 10 March 2015

Bresaola - Air Cured Beef - The Last Bit

So the beef came out of the cure at 9pm on Sunday. This is what it looked like.


It was firmer and a deep red after it's 15 hour wine bath. I dried it off, wrapped it in cheesecloth and popped it into the loft where it will hang for 3 weeks.


Sunday 8 March 2015

Bresaola - Air Cured Beef - The Next Bit

After 15 hours in the dry cure your beef will be a lot firmer. There will also be a bit of liquid in your container. That's the salt drawing out the moisture.


Next 15 hours of wet curing. You'll be needing a bottle of cheap Italian plonk. Not too cheap mind you. Mine was a fiver down from six in Sainsbury's. 


Chuck it over the beef. Turn the beef every hour so that every part gets a stint completely submerged.
Mine will be finished at 9pm. 


Back at 9pm to finish this off.


Saturday 7 March 2015

Bresaola - Air Cured Beef

This is my first bash at this, but I can't really see how anything could possibly go wrong. As it's my first go I've gone for a small piece of beef, but a nice organic one!


So the rule with this is to cure for 24 hours per 500g and then hang for 3 weeks. The curing is done in two stages, one dry and then one wet. For a piece of beef this size I'm curing it for 30 hours, 15 dry and then 15 wet.

For the dry cure you need 3% of weight in sea salt (Maldons), but I'm using 4% as 3% didn't look like enough to me. Then you add whatever flavouring you fancy. I've gone with chilli flakes, freshly cracked pepper corns, torn bay leaf, juniper berries and cloves.


Then 'dredge' your beef through the salt making sure that all size are nicely covered. Pop in the fridge and re-dredge every now and then. It needs 15 hours in all.


At 7am I'll get on with the next bit.


Friday 6 March 2015

Homemade Salami and Chorizo - Week 2

We have some mould! Not a lot, but a little nonetheless! They've certainly lost some weight, about 20% I'd say, and are firmer but not rock hard. They'll certainly be ready in two weeks, if not before!

Friday 27 February 2015

Thursday 19 February 2015

Homemade Salami & Chorizo


The salami recipe I'm using is spot on, straight from the River Cottage Handbook. The chorizo recipe isn't, I'm simply chucking some paprika into the salami recipe. It shouldn't be far off!

Here's the basic salami recipe:

1150g minced pork
70g back fat
1 garlic clove
18g pepper corns
small glass of red wine
2% of the above combined weight in salt

With regards the back fat, initially I struggled to get hold of it. Even the family butcher on the high street didn't have it. Amazingly Morrisons were virtually giving in away. Just take the skin off. The back fat in underneath.


The pepper corns should be lightly bashed up. Ideally you want big lumps of pepper. It's a bit of a pain. I paid a small child a chocolate biscuit to smash mine up.


My ingredients weighed 1285g so I added 26g of salt. I then split the mixture and blathered one half in paprika.


Then...shock horror. I pulled out the hog casings and it looks like I've over salted them the last time I put them away. They're rock hard. I chucked them straight into water. I'll have to wait a few hours now to see if the water revives them. If not I've have to go and beg the butcher on the high street for some.


It came back to life after 5 hours in warm water. Next just fill 'em up using your sausage making machine!


Stick them up in the loft and check on them weekly. They should be ready in six weeks or so!


I'll post a pic every week so that the mould can be observed! Mould = Tasty

Tuesday 17 February 2015

Proper Corned Beef Pie

You've 'corned' your own beef and made some corned beef hash. The end is in sight. You now need to make the pie!

Firstly the shortcrust pastry. The recipe for this is easy to remember. You need half as much fat as flour. I'm looking for a traditional pastry so part of my fat will be luscious lard.

600g plain flour
200g unsalted butter
100g lard
water

I would normally use a blender to make the pastry, but our Magimix is knackered so I'm doing it by hand. Luckily I found a small child to mix the flour, butter and lard together until we were left with breadcrumbs.


Once you have breadcrumbs add a little water, a bit at a time and mix together with a knife. After about 150ml ours was ready to bring together into a ball. Sling it into a plastic bag and whack into the fridge for 30 mins or so.

Next grease your cake tin. With lard! Don't worry, it works. We want a massive pie so we used a deep 9 inch spring form.

Lastly plonk the pastry in, fill in any gaps, fill with hash, sit the top on and fork around the edges to seal. 180 for about 45 minutes will do it.


Salt Beef - Corned Beef (with added Prague Powder) Part Two

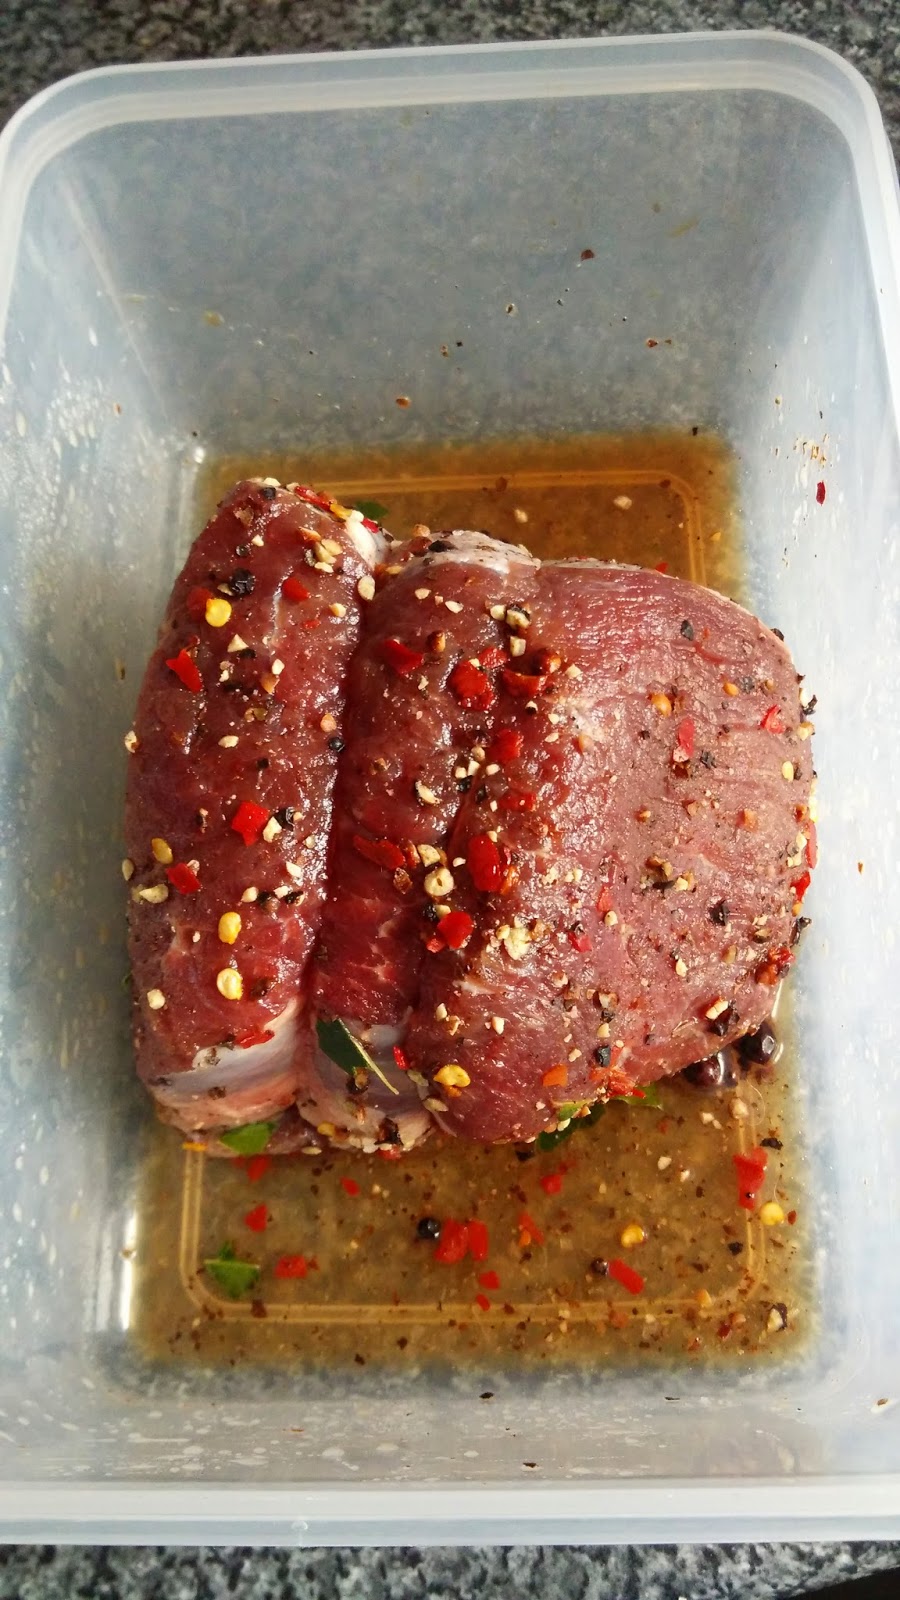
After about 48 hours in the brine your meat will be ready to cook. First of all rinse the lump under some cold water to remove any excess salt.

Next you want to make your poaching stock. I'm using the same spices etc as the cure, but throwing in the customary stock vegetables. In this case a couple of carrots, an onion, halved and a couple of lengths of celery.

You can add the beef when the stock is just barely bubbling. This is important. If you cook the meat in a raging cauldron it will end up tough. The liquid should present barely a murmur. See vid.

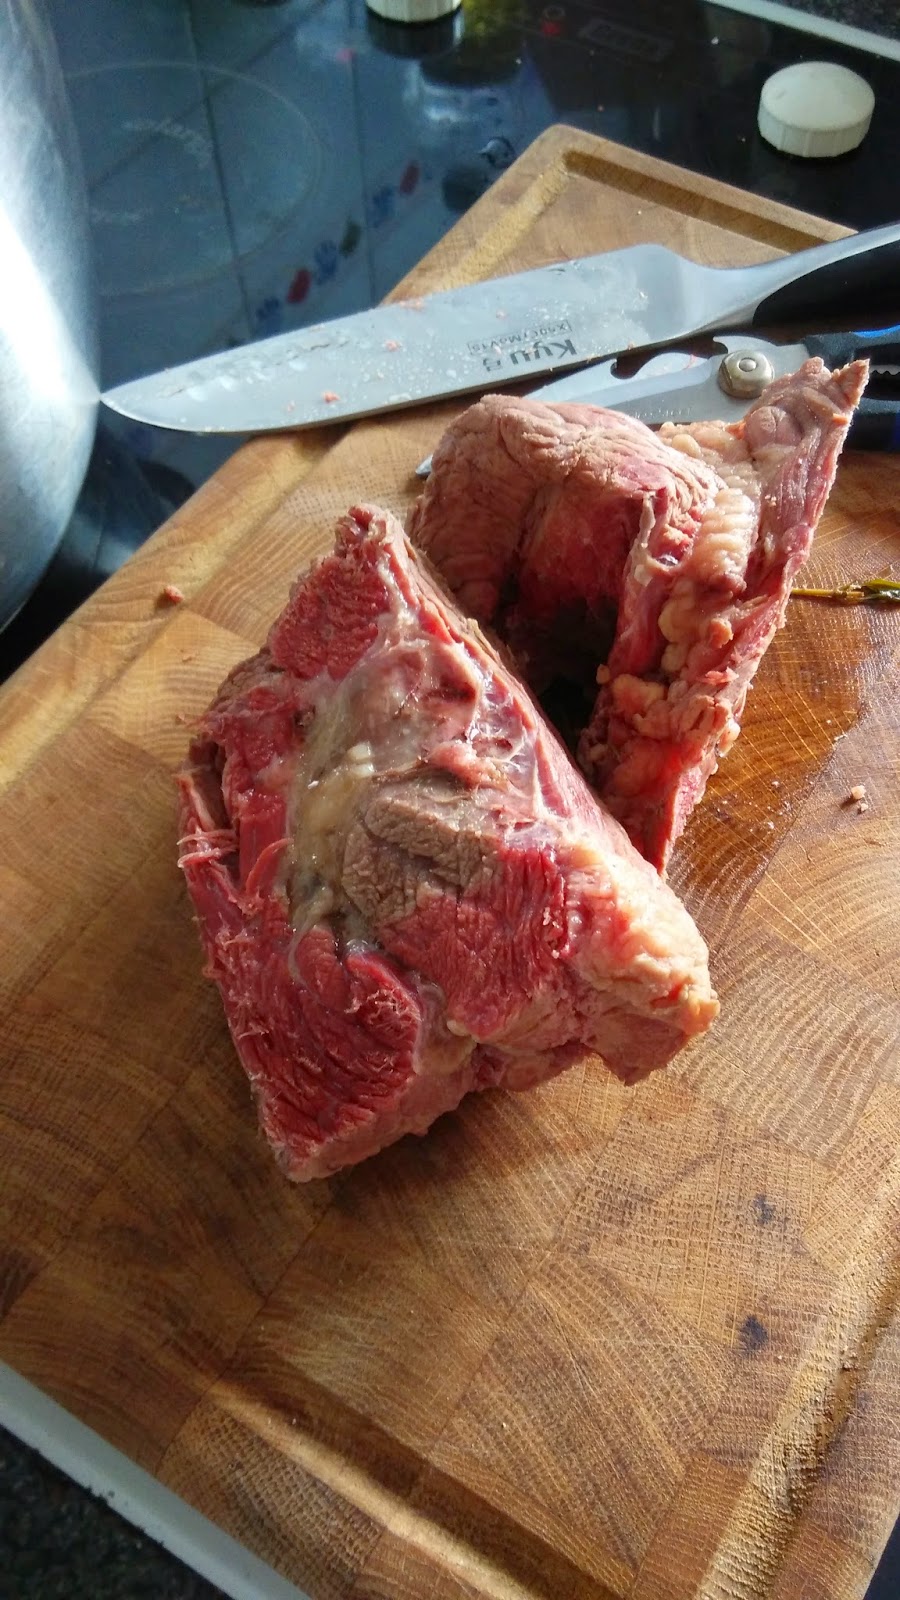
You can leave the beef in there for about 2 hours. Then it'll be falling apart and still pink! Pink, because of the Prague Powder. If you don't have PP you'll end up with grey meat. It'll still be tasty. But it'll be grey.

Next we make the corned beef hash! This is a traditional recipe passed down from my Grandma Griff and shouldn't be tinkered with.

When you take the beef out reserve the flavourful stock. We'll be needing that!


Peel about 2.5kg of spuds and dice 4 medium sized onions. Chuck back into the stock pot and pour the poaching liquid back in so that the spuds and onions are just covered.

Whack the heat up and cook until soft. Next dice your corned beef.

When the spuds are soft put the beef in. Add a few good pinches of black pepper. No need to salt as it's salty enough. Stir in about 3 tablespoons of Bisto and then either mash or wazz-up with a stick blender. It should be about the consistency of molten lava.

You can either eat it now or allow to cool before pie making. I'll be having half for tea tonight and making a pie with the rest.


Saturday 14 February 2015

Salt Beef - Corned Beef (With added Prague Powder!)

This is a doddle to make and sets you up nicely for the king of all corned beef hash pies!

Firstly, you need a nice piece of brisket. No other cut will do so don't let anybody tell you it will! Mine was 1.3kg.

Next you'll need to make the brine that's going to cure this lovely fatty beefy lump.

5l water
750g of cheap salt (The cheaper the better)
300g light brown sugar
3 tps Prague Powder
2 bay leaves
4 cloves
1 star anise
5 juniper berries (squashed)
pepper corns (small handful)
2 cardamon pods
sprig of thyme


Plonk it all in and bring it to the boil, stirring to dissolve the sugar and the salt. As soon as it comes to the boil turn it off and let it cool completely.

Once it's cooled transfer the brine to a non-metallic receptacle, in my case a lego storage box.


Pop the beef in and weight down with something to keep it submerged. Chuck it in the fridge and forget about it for 48 hours!


I'll be back in a couple of days with the next part! The slow inevitable simmer towards corned beef - salt beef perfection!